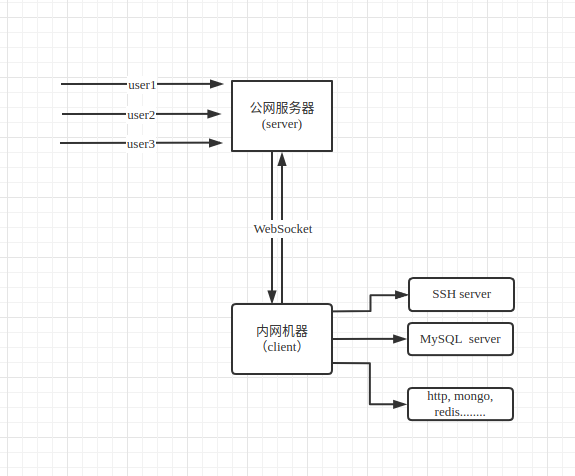
ProxyNT is a reverse proxy server that can expose a local server to the internet through NATs and firewalls
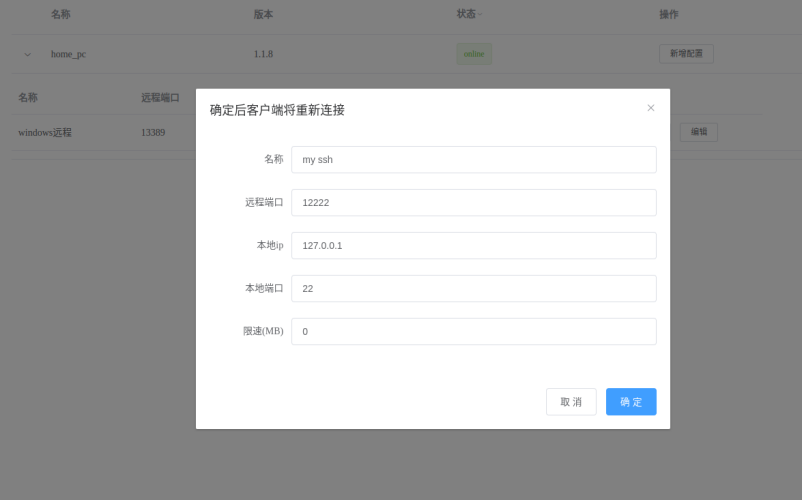
- Open port mapping via browser anytime and anywhere
- Encrypted transmission between public network server and local network client via WebSocket
- Few dependencies, one-click installation via pip
- Stable, automatically reconnect, and already in production environment
- Support for rate limiting
- Hosting website server at home
- Managing IoT devices
pip install -U proxynt
Suppose the public server's IP is 192.168.9.224.
config_s.json content:
{
  "port": 18888,
  "password": "helloworld",
  "path": "/websocket_path",
  "admin": {
    "enable": true,
    "admin_password": "new_password"
  }
}
Then start:
nt_server -c config_s.json
Explanation:
port: Listening portpassword: Connection passwordpath: WebSocket pathadmin: Management page configuration (optional)admin.enable: Whether to enable management pageadmin.admin_password: Management password
config_c.json content:
{
  "server": {
    "port": 18888,
    "host": "192.168.9.224",
    "https": false,
    "password": "helloworld",
    "path": "/websocket_path"
  },
  "client_name": "home_pc",
  "client": []
}
Then start:
nt_client -c config_c.json
Explanation:
server: Configuration of the server to be connected, including port, IP address, whether to use HTTPS, password, and WebSocket path.client_name: Client name, needs to be unique.client: Empty array.
Explanation: The management page path is WebSocket path + /admin .
ssh -oPort=12222 [email protected]- Client config_c.json
{
  "server": {  // Server configuration to connect to
    "port": 18888,  // Port
    "host": "192.168.9.224",  // IP address
    "https": false,  // Whether the server is using HTTPS
    "password": "helloworld",  // Password
    "path": "/websocket_path"  // WebSocket path
  },
  "client": [  // List of forwarding configurations
    {
      "name": "ssh",
      "remote_port": 1222,
      "local_port": 22,
      "local_ip": "127.0.0.1"
    },
    {
      "name": "mongo",
      "remote_port": 1223,
      "local_port": 27017,
      "local_ip": "127.0.0.1"
    }
  ],
  "client_name": "ubuntu1",  // Client name, must be unique
  "log_file": "/var/log/nt/nt.log"  // Path to log file
}
- Server config_c.json
{
    "port": 18888,  // Listening port
    "password": "helloworld",  // Password
    "path": "/websocket_path",  // WebSocket path
    "log_file": "/var/log/nt/nt.log",  // Path to log file
    "admin": {
        "enable": true,  // Whether to enable admin page
        "admin_password": "new_password"  // Password for admin page
    }
}
- 1.1.9: Bandwidth limitation
- 1.1.8: Display client version
- 1.1.7: Fixed duplicate client_name
- 1.1.6: Fixed client WebSocketException: socket is already opened.

